If the access token is not valid, we need to use the refresh token to generate a new access token.
Here’s where we left off in the previous lesson:
providers.forEach(async provider => {  // ...
  if (isValid) {    setLoginStatus({ provider, loggedIn: true })  }
  // Code to generate another access token goes here...})
If we want to write the refresh token flow, we need to make sure the access token is invalid.
There are two ways to invalidate the access token:
- We can wait 2 hours for the access token to become invalid…
- Or we can change the access token’s value so it becomes invalid.
We don’t want to wait 2 hours when we code… so naturally we will choose the second option.
Invalidating the access token
We can invalidate the access token by changing two things:
- The
expiresAtvalue - The
accessTokenvalue
The easiest way is to change the accessToken value in the browser.
To do this, you can open up Local Storage in your developer tools and edit the stored value.
Using the refresh token
We can refresh the access token since the access token is invalid now.
Here, we need to send the refreshToken to the backend. We’ll use the /auth/:provider/refresh endpoint.
providers.forEach(async provider => { // ... const { response } = await zlFetch.post(`/auth/${provider}/refresh`, { body: { refreshToken }, returnError: true, })})We cannot send a refresh request for Github because Github doesn’t have a refresh token. So we need to prevent Github from reaching this point.
providers.forEach(async provider => {  // ...
  // Prevents Github from sending refresh token request  if (provider === 'github') return
  // Send a request to get a new access token  const { response } = await zlFetch.post(`/auth/${provider}/refresh`, {    body: { refreshToken },    returnError: true,  })})
From the backend, we will send a request to Twitter to get the new access token.
You can view the instructions from Twitter here.
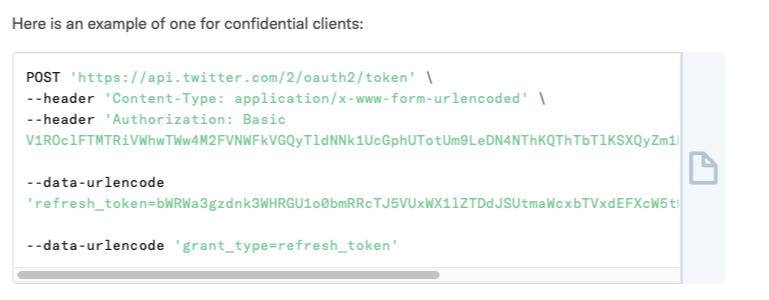
Here’s the code you need to send to Twitter.
router.post('/auth/twitter/refresh', async (req, res) => {  const { refreshToken } = req.body
  const { response } = await zlFetch.post(    'https://api.twitter.com/2/oauth2/token',    {      auth: {        username: process.env.TWITTER_CLIENT_ID,        password: process.env.TWITTER_CLIENT_SECRET,      },      headers: {        'Content-Type': 'application/x-www-form-urlencoded',      },      body: {        refresh_token: refreshToken,        grant_type: 'refresh_token',        client_id: process.env.TWITTER_CLIENT_ID,      },      returnError: true,    },  )
  const token = response.body  console.log(token)})
Twitter will send you a new access token and a new refresh token.

Since Twitter sent us a new refresh token… it simply means we need to update the refresh token value stored in the local storage.
So we send the access token, expiresAt, and refresh token to the frontend.
router.post('/auth/twitter/refresh', async (req, res) => {  // ...
  if (response) {    const token = response.body    const expiresAt = token.expires_in * 1000 + Date.now()
    const params = {      expiresAt,      accessToken: token.access_token,      refreshToken: token.refresh_token,    }
res.json(params) }})We don’t need to send provider to the frontend because the frontend already knows the provider.
We also don’t need to send authStatus to the frontend since we’re passing the information through a request and not through the query string.
We can now grab the new token information and save them to local storage once again.
providers.forEach(async provider => {  // ...
  // Save token with response  const newToken = response.body  localStore.set(provider, {    accessToken: newToken.accessToken,    refreshToken: newToken.refreshToken,    expiresAt: newToken.expiresAt,  })
  // Then we log the user in  setLoginStatus({ provider, loggedIn: true })})
And we have now completely implemented Login with Twitter.
Let’s refactor our code a bit in the next lesson before we move onto the next identity provider.
Welcome! Unfortunately, you don’t have access to this lesson. To get access, please purchase the course or enroll in Magical Dev School.
Unlock this lesson