Creating a library that creates one component is easy. But what makes frameworks like React and Vue shine isn’t because they allow you to put everything into a single component.
What makes them shine is the ability to create children components so you can break your code up into small, manageable pieces.
We’ll do the same too.
Extracting components into separate files
First, we need to extract children components into their respective files. We’ll create the following files:
child.jsfor the child countertotal-count.jsfor the total count
We’ll copy-paste the HTML for each of these components into their respective files.
import Tiny from './Tiny/tiny.js'
export default Tiny({ template() { return ` <div class="component child-component flow"> <h2>Child Counter</h2> <p>Count: ${this.state.childCount}</p> <button tiny-listener="[click, increaseChildCount]">Increase count by 1</button> <button tiny-listener="[click, increaseCount]">Increase parent count by 1</button> </div> ` },})import Tiny from './Tiny/tiny.js'
export default Tiny({ template() { return ` <div class="component total-component flow text"> <h2>Total Count</h2> <ul> <li>Parent Count: ${this.state.count}</li> <li>Child Count: ${this.state.childCount}</li> <li>Total Count: ${this.state.count + this.state.childCount}</li> </ul> </div> ` },})We will then remove the HTML for the children components from main.js. We’ll add the child component in a bit.
Tiny({  // ...  template() {    return `      <div class="component parent-component flow">        <h1>Parent Counter</h1>        <p>Count: ${this.state.count}</p>        <button tiny-listener="[click, increaseCount]">Increase count by 1</button>
        <div class="half">          <!-- removed stuff from here -->        </div>      </div>    `  },})
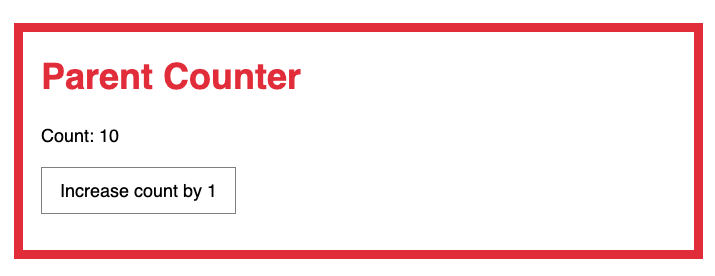
Here’s what you should have at this point:
Importing Components
We need to import children components into the parent component — so we can render them together.
Here’s how React does this:
import ChildComponent from 'somewhere'class ParentComponent extends React.Component { render() { return ( <div className="parent-component"> <ChildComponent /> </div> ) }}Like React, before we can include the child component in the parent component, we need to import the child component first.
import child from './child.js'When we import child we face an error immediately. This error says childCount is not defined.
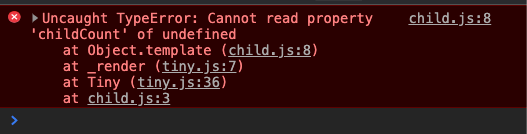
It happened because the child component doesn’t have a state. We can fix this problem by including a state.
Since we’re already inside the child component, we don’t have to use the childCount property anymore. We can use count instead.
export default Tiny({  state: {    count: 5,  },
  template() {    return `      <div class="component child-component flow">        <h2>Child Counter</h2>        <p>Count: ${this.state.count}</p>        <button tiny-listener="[click, increaseChildCount]">Increase count by 1</button>        <button tiny-listener="[click, increaseCount]">Increase parent count by 1</button>      </div>    `  },})
If you refresh now, you’ll get a second error:
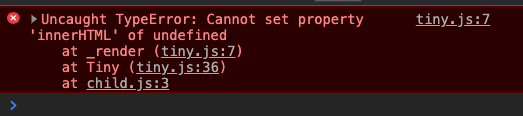
This happens because we’re trying to render the template into an HTML element. But since we did not pass in a selector value, there’s no HTML element to render to.
We can prevent this error by rendering elements if they contain a selector property.
export default function Tiny(options) {  // ...
  if (options.selector) {    _render()    _addEventListeners()  }}
At this point, you should see the parent counter again, but there’s no child counter yet.
Inserting the Child Component via Tiny
We need to insert the child component into the DOM. To do this, our template needs to know what the child component is.
One way of doing this is to pass a custom attribute into the HTML once more. We’ll call this tiny-component.
We’ll set tiny-component to the name of the component we want to use.
Tiny({ // ... template() { return ` <div class="component parent-component flow"> <!-- ... --> <div class="half"> <div tiny-component="child"></div> </div> </div> ` },})Tiny needs to know how to find this child component. The only way is to get users to pass in the child into the parent component.
We’ll put children components inside a components property to make things tidier for use inside Tiny.
Tiny({  // ...  components: {    child,  },
  template() {    return `      <div class="component parent-component flow">        <!-- ... -->        <div class="half">          <div tiny-component="child"></div>        </div>      </div>    `  },})
We can now get the child component via the components.
export default function Tiny(options) { // ... console.log(options.components)}
The first undefined comes from child.js since we didn’t include any components property. The second comes from main.js, where we see child is a component.
When we create options for users, it’s always a good idea to initialize the option with a default value. In this case, we can set components to an empty object.
const initial = {  components: {},}
export default function Tiny(options) {  options = Object.assign({}, initial, options)  // ...}
Rendering the child component
There’s quite a bit of code to write to render a child component, so let’s start by creating a _renderChildComponents function.
export default function Tiny(options) { // ... function _renderChildComponents() {}}We need to render the parent component first before we can find the child components. We do this by running _renderChildComponents after _render.
export default function Tiny(options) { // ... if (options.selector) { _render() _addEventListeners() _renderChildComponents() }}The first thing we need is to find all children components. We can find all children components by searching for the tiny-component attribute.
export default function Tiny(options) { // ... function _renderChildComponents() { const compEls = element.querySelectorAll('[tiny-component]') }}We’ll loop through the Nodelist to get each component placeholder’s element. From there, we can use getAttribute to find the component name.
export default function Tiny(options) { // ... function _renderChildComponents() { const compEls = element.querySelectorAll('[tiny-component]') for (const compEl of compEls) { const compName = compEl.getAttribute('tiny-component') console.log(compName) } }}
The actual component can be found in the components property.
export default function Tiny(options) { // ... function _renderChildComponents() { const compEls = element.querySelectorAll('[tiny-component]') for (const compEl of compEls) { const compName = compEl.getAttribute('tiny-component') const comp = options.components[compName] console.log(comp) } }}At this point, the child component is undefined because Tiny doesn’t return anything.

To fix this, we need to return the child component from Tiny, so we can use it on the parent component. We can do this by returning the options object (which essentially contains everything about the component).
export default function Tiny(options) { // ... return options}We’ll now get information about the child component in the DOM.
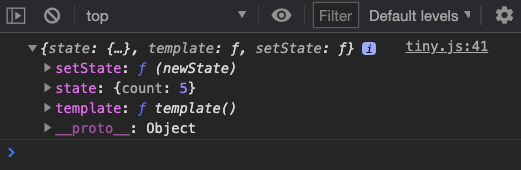
To render the child component onto the element, we can set the compEls innerHTML, and voilà, we get the child component in the DOM.
export default function Tiny(options) { // ... function _renderChildComponents() { const compEls = element.querySelectorAll('[tiny-component]') for (const compEl of compEls) { // ... compEl.innerHTML = comp.template() } }}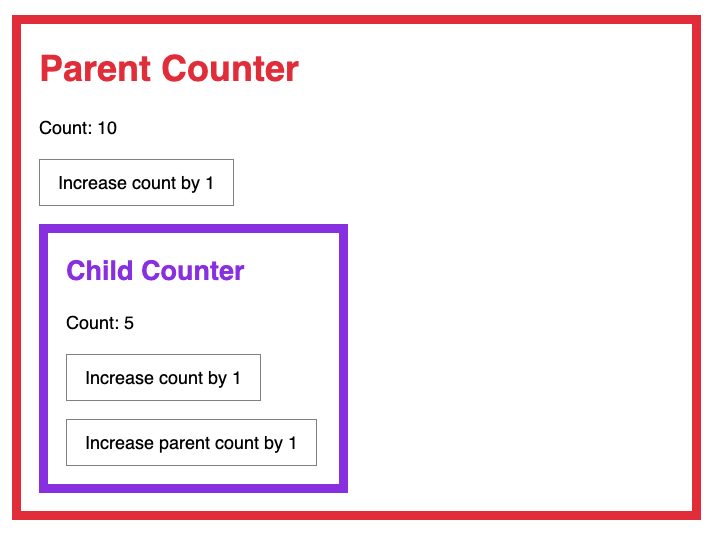
We can reuse the _render function to run this line of code. To do this, we need to pass the element and options into _render. We’ll call the template method in _render.
export default function Tiny(options) { // ... function _render(element, options) { element.innerHTML = options.template() } // ... function _renderChildComponents() { const compEls = element.querySelectorAll('[tiny-component]') for (const compEl of compEls) { // ... _render(compEl, comp) } } // ...}Whenever we call _render, we need to pass in the element and options to use.
export default function Tiny(options) { // ... if (options.selector) { _render(element, options) _addEventListeners() _renderChildComponents() }}Adding event listeners to child components
Children components may also have their own event listeners. We can add event listeners by reusing the _addEventListeners function, but we need to modify it to accept the current component’s element and options.
export default function Tiny(options) { // ... function _addEventListeners(element, options) { // ... }}We can pass in the compEl and comp respectively.
export default function Tiny(options) {  // ...  function _renderChildComponents() {    const compEls = element.querySelectorAll('[tiny-component]')    for (const compEl of compEls) {      // ...      _addEventListeners(compEl, comp)    }  }
  // ...}
Since _addEventListeners now requires element and options arguments, we ought to make things explicit when calling _addEventListeners every time.
export default function Tiny(options) { // ... if (options.selector) { _render(element, options) _addEventListeners(element, options) _renderChildComponents() }}At this point, you’ll notice an error that says cannot read property bind of undefined.
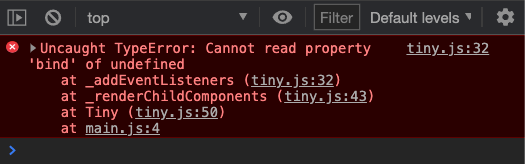
This error occurs because we haven’t created event handlers in the child component!
For these handlers, we’ll create an increaseCount method instead of increaseChildCount since we’re coding inside the child component.
We’ll also create an increaseParentCount instead of increaseCount to increase the parent’s counter.
export default Tiny({  // ...  increaseCount(event) {    this.setState({      count: this.state.count + 1,    })  },
  increaseParentCount(event) {    console.log('Increasing Parent Count')  },
  template() {    return `      <div class="component child-component flow">        <h2>Child Counter</h2>        <p>Count: ${this.state.count}</p>        <button tiny-listener="[click, increaseCount]">Increase count by 1</button>        <button tiny-listener="[click, increaseParentCount]">Increase parent count by 1</button>      </div>    `  },})
There should be no more errors now.
Updating the Child’s counter
If you try to click any button, you’ll run into an error that says cannot read property of template of undefined.
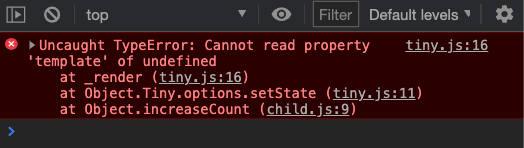
This error occurs because we used _render and _addEventListeners in setState without passing in the component’s element and options.
export default function Tiny(options) { // ... options.setState = function (newState) { // ... // We didn't pass in element and options _render() _addEventListeners() } // ...}We can get options easily from both parent and child components since options is used directly on setState. But we can’t get the element directly.
To get the component’s element, we can set an element property in options before we use _render.
export default function Tiny(options) {  const element =    typeof options.selector === 'string'      ? document.querySelector(options.selector)      : options.selector
  // Setting element on parent component  options.element = element  // ...}
export default function Tiny(options) { function _renderChildComponents() { const compEls = element.querySelectorAll('[tiny-component]') for (const compEl of compEls) { const compName = compEl.getAttribute('tiny-component') const comp = options.components[compName]
// Setting element on child component comp.element = compEl _render(compEl, comp) _addEventListeners(compEl, comp) } }}options.element will contain the element now. We can pass this value into _render and _addEventListeners when we’re in setState.
export default function Tiny(options) {  options.setState = function (newState) {    const entries = Object.entries(newState)    for (const entry of entries) {      options.state[entry[0]] = entry[1]    }
_render(options.element, options) _addEventListeners(options.element, options) }}A tiny refactor
There’s no point passing options.element and options into the same function – options already contains element!
We can refactor _render and _addEventListeners to use the options object instead.
export default function Tiny (options) {  // ...  function _render (options) {    options.element.innerHTML = options.template()  }
  function _addEventListeners (options) {    const listenerElements = options.element.querySelectorAll('[tiny-listener]')    // ...    }  }  // ...}
And we only need to pass options when we use them
export default function Tiny(options) {  // ...  options.setState = function (newState) {    // ...    _render(options)    _addEventListeners(options)  }
  function _renderChildComponents() {    const compEls = element.querySelectorAll('[tiny-component]')    for (const compEl of compEls) {      // ...      _render(comp)      _addEventListeners(comp)    }  }
  // ...
  if (options.selector) {    _render(options)    _addEventListeners(options)    _renderChildComponents()  }}
Fixing the Parent Counter
The child counter disappears when you click a button on the parent counter.
This happens because children components are not re-rendered when the component gets re-rendered. The simple fix is to run _renderChildComponents in setState.
export default function Tiny(options) { // ... options.setState = function (newState) { // ... _render(options) _addEventListeners(options) _renderChildComponents(options) } // ...}This means we need to configure _renderChildComponents to use the options.
export default function Tiny(options) { // ... function _renderChildComponents(options) { const compEls = options.element.querySelectorAll('[tiny-component]') // ... }}And we need to pass options into all _renderChildComponents calls.
export default function Tiny(options) { // ... if (options.selector) { _render(options) _addEventListeners(options) _renderChildComponents(options) }}Welcome! Unfortunately, you don’t have access to this lesson. To get access, please purchase the course or enroll in Magical Dev School.
Unlock this lesson