We ended the previous lesson by “breaking” the Popover. If you clicked on each popover trigger right now, nothing happens.
Why? That’s because we haven’t added event listeners to show the popovers!
Let’s fix this by adding event listeners.
Adding event listeners
We have a total of five event listeners:
- One to show/hide popovers when users click on their corresponding trigger elements.
- One to hide popovers when users click outside a popover
- One to tab into popovers
- One to tab out of popovers
- One to close popovers with the escape key
We’ll work on #1, #3, #4, #5, then back to #2. I saved #2 for the last because it’s a little more complicated than the rest.
Showing/Hiding Popovers
Here’s the event listener we used to show and hide popovers when a user clicks a trigger element.
document.addEventListener('click', event => {  const popoverTrigger = event.target.closest('.popover-trigger')  if (!popoverTrigger) return
  const popover = document.querySelector(`#${popoverTrigger.dataset.target}`)  if (popover.hasAttribute('hidden')) {    showPopover(popover)  } else {    hidePopover(popover)  }})
We can add this event listener into Popover after the Execution phase.
export default function Popover(triggerElement) {  // ...  // Execution  const popoverPosition = popover.calculatePosition()  popoverElement.style.top = `${popoverPosition.top}px`  popoverElement.style.left = `${popoverPosition.left}px`  popover.hide()
  // Adding event listeners  document.addEventListener('click', event => {    const popoverTrigger = event.target.closest('.popover-trigger')    if (!popoverTrigger) return
    const popover = document.querySelector(`#${popoverTrigger.dataset.target}`)    if (popover.hasAttribute('hidden')) {      showPopover(popover)    } else {      hidePopover(popover)    }  })}
We can use a named callback to make the event listener easier to read. We’ll call this handleClick since the purpose of this event listener is to handle a click event.
export default function Popover(triggerElement) {  // ...
  const popover = {    handleClick(event) {      // Event listener code goes here    },  }
  // ...
  // Adding event listeners  document.addEventListener('click', popover.handleClick)}
Improving the event listener
Here’s the code for the event listener right now:
const popover = {  // ...  handleClick(event) {    const popoverTrigger = event.target.closest('.popover-trigger')    if (!popoverTrigger) return
    const popover = document.querySelector(`#${popoverTrigger.dataset.target}`)    if (popover.hasAttribute('hidden')) {      showPopover(popover)    } else {      hidePopover(popover)    }  },}
In the first two lines of handleClick, we searched for the popover trigger from the event. We need to perform this search because we listened to the document element.
We can skip the search if we listened to the trigger element instead – if the callback triggers, we know the user click the trigger element. This method creates more event listeners in the document, but it makes it easier to write code event handlers.
export default function Popover() {  // ...  const popover = {    // ...    handleClick(event) {      // Delete these lines      const popoverTrigger = event.target.closest('.popover-trigger')      if (!popoverTrigger) return    },  }
  triggerElement.addEventListener('click', popover.handleClick)}
In the next line of handleClick, we tried to find popover with the trigger element. We don’t need to find popover anymore because we have popoverElement in the lexical scope.
const popover = { // ... handleClick(event) { // Delete this const popover = document.querySelector(`#${popoverTrigger.dataset.target}`) },}So all we need inside handleClick is this:
const popover = { // ... handleClick(event) { if (popover.hasAttribute('hidden')) { showPopover(popover) } else { hidePopover(popover) } },}We already added hidePopover in the previous lesson. We named it hide.
const popover = { // ... handleClick(event) { if (popover.hasAttribute('hidden')) { showPopover(popover) } else { popover.hide() } },}We can add showPopover to Popover the same way we added hidePopover. We’ll name it show.
const popover = {  // ...  show() {    popoverElement.removeAttribute('hidden')  },
  handleClick(event) {    if (popoverElement.hasAttribute('hidden')) {      popover.show()    } else {      popover.hide()    }  },}
Since if/else statements add cognitive overhead when reading code, we can make things more concise by using a ternary operator.
const popover = { // ... handleClick(event) { popoverElement.hasAttribute('hidden') ? popover.show() : popover.hide() },}That’s it! Let’s work on the next event listener.
Listening to the Tab key
The next two events handle tabbing into and out of Popovers. They both use the Tab key.
// Allows Tabbing into Popoverdocument.addEventListener('keydown', event => {  const { key } = event  if (key !== 'Tab') return  if (event.shiftKey) return
  const popoverTrigger = event.target.closest('.popover-trigger')  if (!popoverTrigger) return
  const popover = getPopover(popoverTrigger)  const focusables = getKeyboardFocusableElements(popover)  const shouldTabIntoPopover =    !popover.hasAttribute('hidden') && focusables.length !== 0
  if (shouldTabIntoPopover) {    event.preventDefault()    focusables[0].focus()  }})
// Tabs out of popoverdocument.addEventListener('keydown', event => {  const popover = event.target.closest('.popover')  if (!popover) return  if (event.key !== 'Tab') return
  const popoverTrigger = getPopoverTrigger(popover)  const focusables = getKeyboardFocusableElements(popover)
  if (event.shiftKey && event.target === focusables[0]) {    event.preventDefault()    return popoverTrigger.focus()  }
  if (!event.shiftKey && event.target === focusables[focusables.length - 1]) {    return popoverTrigger.focus()  }})
We can create these events in Popover like this:
export default function Popover(triggerElement) { // ... document.addEventListener('keydown', handleTriggerTab) document.addEventListener('keydown', handlePopoverTab)}Creating handleTriggerTab
Here’s the code we wrote to handle a Tab on the trigger element.
document.addEventListener('keydown', event => {  const { key } = event  if (key !== 'Tab') return  if (event.shiftKey) return
  const popoverTrigger = event.target.closest('.popover-trigger')  if (!popoverTrigger) return
  const popover = getPopover(popoverTrigger)  const focusables = getKeyboardFocusableElements(popover)  const shouldTabIntoPopover =    !popover.hasAttribute('hidden') && focusables.length !== 0
  if (shouldTabIntoPopover) {    event.preventDefault()    focusables[0].focus()  }})
We can omit the following lines:
- Lines 4 and 5 because we have
triggerElementin the lexical scope. - Lines 6 because we have
popoverElementin the lexical scope.
We should have this removing the code I mentioned:
const popover = {  // ...  handleTriggerTab(event) {    const { key } = event    if (key !== 'Tab') return    if (event.shiftKey) return
    const focusables = getKeyboardFocusableElements(popoverElement)    const shouldTabIntoPopover =      !popoverElement.hasAttribute('hidden') && focusables.length !== 0
    if (shouldTabIntoPopover) {      event.preventDefault()      focusables[0].focus()    }  },}
When I read through this code, I felt that shouldTabIntoPopover is way too complicated. Since we had two conditions that must be matched, we can make things easier by checking for one condition at a time.
First, we check whether popoverElement is visible. If it is not visible, we will do an early return since its impossible for users to tab into the Popover.
const popover = {  // ...  handleTriggerTab(event) {    const { key } = event    if (key !== 'Tab') return    if (event.shiftKey) return
    const focusables = getKeyboardFocusableElements(popoverElement)
    if (popoverElement.hasAttribute('hidden')) return  },}
Next, if the popover contains 0 focusable elements, we don’t let users tab into it as well. We can do another early return.
const popover = { // ... handleTriggerTab(event) { // ... if (popoverElement.hasAttribute('hidden')) return if (focusables.length === 0) return },}Finally, we let users tab into the popover.
const popover = { // ... handleTriggerTab(event) { // ... event.preventDefault() focusables[0].focus() },}getKeyboardFocusableElements
handleTriggerTab needs getKeyboardFocusableElements to work. I choose to put getKeyboardFocusableElements outside Popover since it’s more of a helper function than a Popover related code.
export default function Popover(triggerElement) {  // ...}
function getKeyboardFocusableElements() {  // ...}
Writing handlePopoverTab
The next event listener handles tabbing out of a Popover. Here’s the code:
document.addEventListener('keydown', event => {  const popover = event.target.closest('.popover')  if (!popover) return  if (event.key !== 'Tab') return
  const popoverTrigger = getPopoverTrigger(popover)  const focusables = getKeyboardFocusableElements(popover)
  if (event.shiftKey && event.target === focusables[0]) {    event.preventDefault()    return popoverTrigger.focus()  }
  if (!event.shiftKey && event.target === focusables[focusables.length - 1]) {    return popoverTrigger.focus()  }})
We can omit the following lines:
- Lines 1 and 2 because we have
popoverElementin the lexical scope - Line 4 because we have
triggerElementin the lexical scope.
Here’s what we have after omitting the lines above:
const popover {  handlePopoverTab (event) {    if (event.key !== 'Tab') return    const focusables = getKeyboardFocusableElements(popoverElement)
    if (event.shiftKey && event.target === focusables[0]) {      event.preventDefault()      return triggerElement.focus()    }
    if (!event.shiftKey && event.target === focusables[focusables.length - 1]) {      return triggerElement.focus()    }  }}
Handling the Escape key
We have an event listener that listens to the Escape key.
// Escape to close popoverdocument.addEventListener('keydown', event => {  const { key } = event  if (key !== 'Escape') return
  const popover = event.target.closest('.popover')  if (!popover) return
  hidePopover(popover)  const popoverTrigger = getPopoverTrigger(popover)  popoverTrigger.focus()})
This event listener closes the popover when users press Escape inside the Popover. Let’s copy-paste this into the Popover.
export default function Popover() {  // ...  document.addEventListener('keydown', event => {    const { key } = event    if (key !== 'Escape') return
    const popover = event.target.closest('.popover')    if (!popover) return
    hidePopover(popover)    const popoverTrigger = getPopoverTrigger(popover)    popoverTrigger.focus()  })}
Here are a few improvements:
- We can omit
popoverbecause we already havepopoverElementin the lexical scope. - We can omit
popoverTriggerbecause we havetriggerElementin the lexical scope. - We can use
popover.hideinstead ofhidePopover(popover)
export default function Popover() {  // ...  document.addEventListener('keydown', event => {    const { key } = event    if (key !== 'Escape') return
    popover.hide()    triggerElement.focus()  })}
One final thing. We only only want to hide the popover if users press Escape inside the popover element. We can do this by listening to popoverElement instead of document. If we used document, we need to use a closest check to make sure we’re on the right popover.
export default function Popover() {  // ...  popoverElement.addEventListener('keydown', event => {    const { key } = event    if (key !== 'Escape') return
    popover.hide()    triggerElement.focus()  })}
We can put the entire callback into a named function:
export default function Popover(triggerElement) {  // ...  const popover = {    // ...    handleEscapeKey(event) {      // Paste the callback here    },  }
  // ...  popoverElement.addEventListener('keydown', popover.handleEscapeKey)}
Clicking outside the popover
There’s one more event listener to work with. This one closes all popover elements if the clicked target is:
- Not a popover
- Not a trigger
document.addEventListener('click', event => { if ( !event.target.closest('.popover') && !event.target.closest('.popover-trigger') ) { const popovers = [...document.querySelectorAll('.popover')] popovers.forEach(popover => hidePopover(popover)) }})There are two ways to write this code:
Method 1
The first way is to copy the code into Popover. If we do this, we create one event listener for every popover instance.
export default function Popover() { // ... document.addEventListener('click', event => { if ( !event.target.closest('.popover') && !event.target.closest('.popover-trigger') ) { const popovers = [...document.querySelectorAll('.popover')] popovers.forEach(popover => hidePopover(popover)) } })}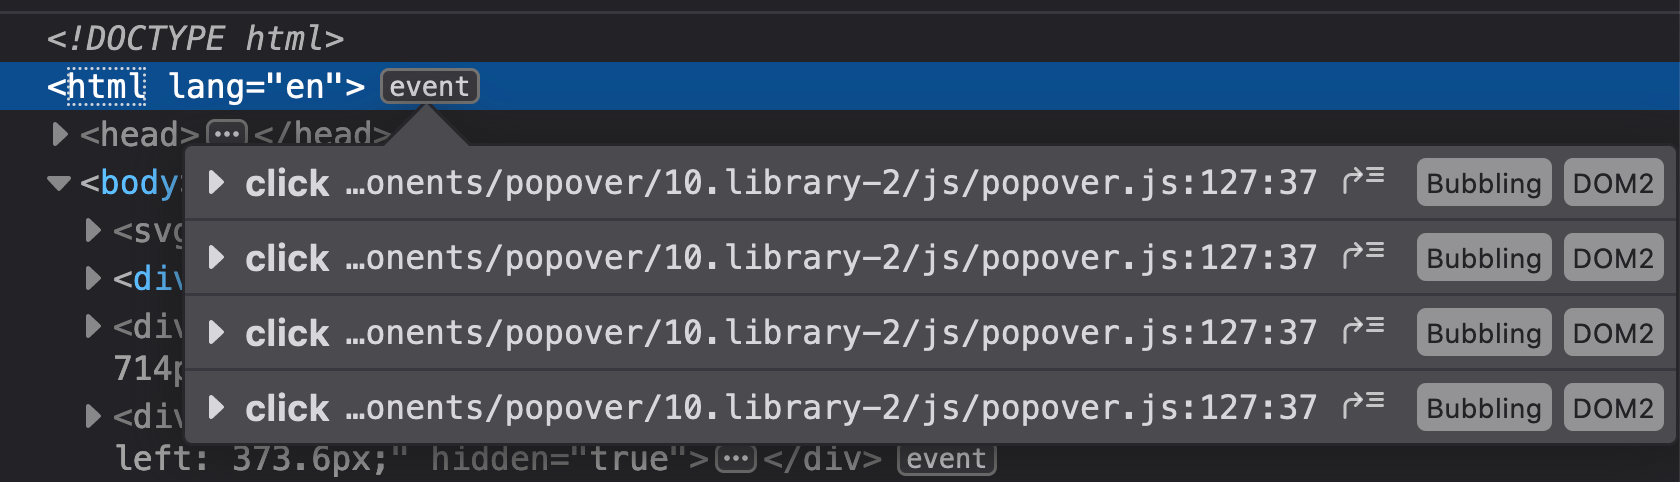
Duplicated event listeners can be a source of problems if left unchecked.
For example, let’s say you have an event listener that opens or closes a window. If the user clicks once, you open the window. If the user clicks twice, you close the window. In this case, if you had two event listeners running at the same time listeners, you’ll always close the window (because both event listeners will fire).
We can prevent duplicated event listeners by pointing browsers to the same callback handler. This means we have to create a named callback outside of Popover.
export default function Popover() {  // ...  document.addEventListener('click', closeAllPopovers)}
function closeAllPopovers(event) {  if (    !event.target.closest('.popover') &&    !event.target.closest('.popover-trigger')  ) {    const popovers = [...document.querySelectorAll('.popover')]    popovers.forEach(popover => hidePopover(popover))  }}
Notice we need hidePopover? We cannot use popover.hide because it works only on an instance.
If we want to use popover.hide we need to keep track of all available popover instances in an array. Then, we loop through this array to hide the popovers.
We can do this in three steps.
First, We create the popovers array
const popovers = []Second, we add each popover instance to popovers when we create them.
export default function Popover(triggerElement) {  // ...  // Execution
  // Add popover to popovers array  popovers.push(popover)
  // Event listeners}
Third, we loop through the popovers array and hide each popover.
export default function Popover() {  // ...  document.addEventListener('click', closeAllPopovers)}
function closeAllPopovers(event) {  if (    !event.target.closest('.popover') &&    !event.target.closest('.popover-trigger')  ) {    popovers.forEach(popover => popover.hide())  }}
Method 2
The method above is the “most technically correct” way to create global event listeners for multiple instances. But it can be complicated if you’re not used to it.
If you don’t have lots of instances on the same page, performance doesn’t really suffer, so we can use an alternate method to close popovers.
In this case, we’ll add the event listener inside Popover.
export default function Popover() { // ... document.addEventListener('click', event => { // ... })}We can then check whether the event target is within popoverElement or triggerElement. If they aren’t in any element, we hide the popover.
export default function Popover() { // ... document.addEventListener('click', event => { const target = event.target if ( target.closest('.popover') !== popoverElement && target.closest('button') !== triggerElement ) { console.log('hello') popover.hide() } })}This creates an effect where only one popover can be active at one time.
That’s it!
Welcome! Unfortunately, you don’t have access to this lesson. To get access, please purchase the course or enroll in Magical Dev School.
Unlock this lesson