There are two ways to authenticate with JavaScript:
- Basic authentication
- OAuth authentication
Basic Authentication
Basic authentication happens when you send your username and password to a server. The server will check whether your username and password are correct. If they are correct, the server gives you access.
To perform basic authentication in JavaScript, you need to send an Authorization header. The value should be Basic plus a base64 encoded string.
Base64 is a format to transfer binary data. Encoding is the process of converting text to a format like Base64. Decoding is the process of converting from a format like base64 back to text.
To convert text to Base64, you can use the btoa function. For authentication, we want to encode your username and password like this:
// Replace username with your username// Replace password with your passwordconst encoded = btoa('username:password')The Authorization header looks like this in XHR and Fetch.
// Authorization header with XHRrequest.setRequestHeader('Authorization', `Basic ${encoded}`)
// Authorization header with Fetchfetch('some-url', {  headers: {    Authorization: `Basic ${encoded}`,  },})
Few APIs use Basic Authentication nowadays because OAuth is more secure. However, it is still useful to know how to do basic authentication since you may run into situations where you need them.
We will use Basic Authentication when we create a Todolist in a later lesson.
Authenticating with OAuth
OAuth (Open Authorization) is a stand for performing authentication and authorization. It requires more steps compared to basic authentication.
Authenticating vs Authorization
Authenticating is the process of verifying who you claim to be. The API verifies you by checking your username and password.
Authorization is the process of verifying whether you can perform the requested action. Think of it as parental rights. You may give your child access to the App store to download free things, but you don’t let them buy. If they try to buy something, they’ll get an error message.
Obtaining an access token
OAuth replaces the username:password combination with an access token. You can get an access token through one of these means:
- Logging into the app to retrieve a token
- Authorization Code Flow
- Proof Key for Code Exchange (PKCE)
- Refresh Token Flow
- Client Credentials Flow
- Device Code Flow
We’re going to use the first method in this lesson.
The rest of the methods require a server, which is out of this course’s scope. We’ll go through them in detail in a separate course called Understanding Asynchronous JavaScript.
Authenticating with OAuth
Once you obtain the access token, you need to send the token through the Authorization header. This header must begin with Bearer.
// Authorization header with XHRrequest.setRequestHeader('Authorization', `Bearer ${encoded}`)
// Authorization header with Fetchfetch('some-url', {  headers: {    Authorization: `Bearer ${encoded}`,  },})
Authenticating with Github
First, we need to create an access token for Github.
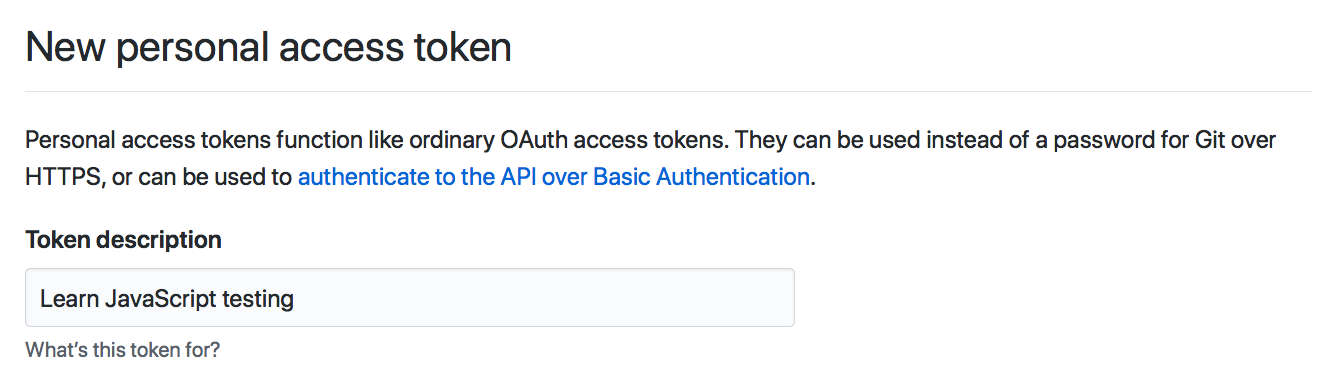
Go to this page. and click on Generate new token. You will need to give a description for this token.
You can also choose what the person (or program) accessing Github with the token can do. This is called scopes.
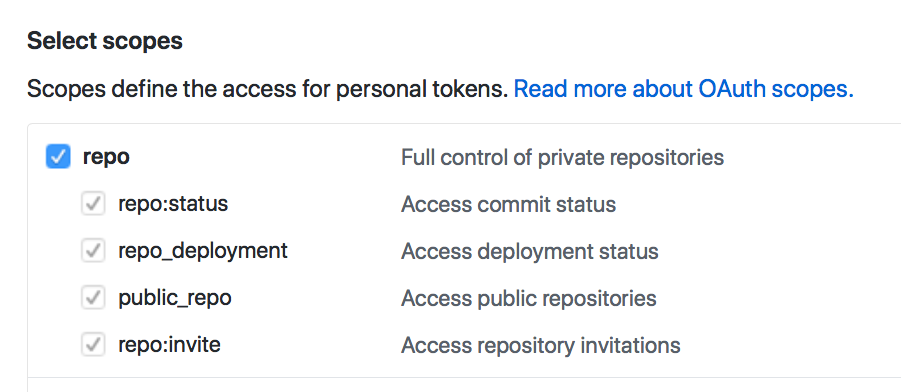
Scroll down and click on Generate token. You will see your token. Copy it immediately. You won’t be able to see it again.

Don’t give anyone access to your token to anyone. (More on this in a later next section). I’m only showing it to you because I want you to know how it looks like. You won’t be able to use it anyway because I deleted it already 😈.
Try sending a request again with the following link. Use your access token this time. You will only be able to fetch the request if you’re authenticated.
// Fetching yourfetch('https://api.github.com/user/repos', { headers: { Authorization: `Bearer ${token}`, },})Logging in with Facebook, Twitter, Google, etc
OAuth lets us create applications to log users in with a service like, Facebook, Twitter, Google, Github, etc.
This process requires four steps:
- You send the user to the service through a link
- The service authenticates the user and redirects back to your application
- You use the parameters the service returns to request for a token.
- You then use the token to request for an API.
This process is known as the Authorization Code Flow. We cover Authorization Code Flow in detail in a separate course called Understanding Asynchronous JavaScript.
Don’t authenticate through a browser with your personal access token
Anyone can see JavaScript you wrote by inspecting your code. They can steal your credentials (username, password, or access token) if you put them directly in your JavaScript code.
People can hurt you really badly if they steal your credentials. For example, I got surprised by a $60,000 bill Amazon after a a friend leaked my Amazon access token by accident.
Lucky for me, I didn’t have to pay. Amazon decided to waive the fee off.
Protect your credentials. Don’t leak it to anyone.
The best way to prevent people from stealing our credentials is to authenticate through a server. This is a reason why many APIs don’t support CORS.
Again, this is a topic we’ll go into in Understanding Asynchronous JavaScript.
Exercise
- Perform a token-based authentication with Github
Welcome! Unfortunately, you don’t have access to this lesson. To get access, please purchase the course or enroll in Magical Dev School.
Unlock this lesson